Error Showing Content - please login as admin for details.
Error Showing Content - please login as admin for details.
#1 Getting Started with Formulas
Create Your First Formula
We'll show you how customize your 2sxc edit forms using formulas
In this tutorial you'll learn how to:
-
Create new formulas for your content fields
-
Choose the correct target type
-
Add the formula script
Important: The feature "Public Use of Edit Form" is disabled
The feature is needed for anonymous users to use the Edit Form. Register your site here https://patrons.2sxc.org/ to get access to the feature.
Brief Demo
Click on the (Σ) button above to see the edit-UI with the formula.
Add a new formula
For this example we'll create a formula, that makes the description field visible, once the title has been set.
First: Enter the Debug mode by pressing CTRL, Shift, Alt and clicking on a 2sxc dialog.
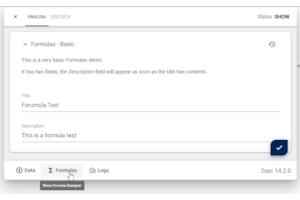
Navigate to the items of your content type in 2sxc. Click on a item and press the Formulas button.
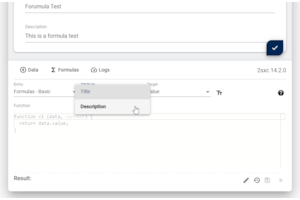
This should bring up the formulas editor. Select the attribute from the dropdown, on which the formula should be set.
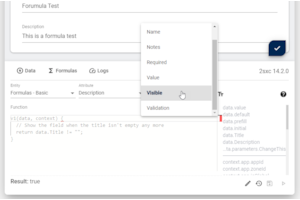
Select the formula target from the next dropdown. Depending on the chosen attribute available targets can vary due to the content type.
Click on edit to make the formula function editable.
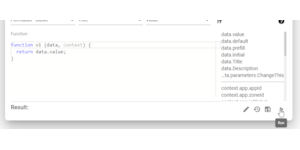
Now you can write your formula function and test it by clicking on the run button. You will see a change in the current edit form and the result after running it.

You can access other attributes using the passed data. See data and context object docs for additional information.
Result
This formula determines the visibility of the Description field. It only becomes visible when the Title field isn't empty.
Click on the (Σ) button above to try the formula we've added.
Formulas of FormulasBasic.Description
Setting Visible (Formula-Target: Field.Settings.Visible)
v1(data, context) {
  // Show the field when the title isn't empty any more
  return data.Title != "";
}
#1 Getting Started with Formulas
@inherits Custom.Hybrid.Razor14
@using ToSic.Razor.Blade;
<!-- unimportant stuff, hidden -->

<div class="row">
  <div class="col-md-7">
    <h2>Create Your First Formula</h2>
    <p>We'll show you how customize your 2sxc edit forms using formulas</p>
    <p>In this tutorial you'll learn how to:</p>
    <ul>
      <li>
        Create new formulas for your content fields
      </li>
      <li>
        Choose the correct target type
      </li>
      <li>
        Add the formula script
      </li>
    </ul>
    <br>
  </div>
  @Html.Partial("../shared/_DefaultInfoSection.cshtml")
</div>
@Html.Partial("../shared/_WarnAnonymousIfFeatureIsOff.cshtml")

<h3>
  Brief Demo
  @fHlp.DemoToolbar(contentType).AsTag()
</h3>
<p>
  Click on the (Σ) button above to see the edit-UI with the formula.
</p>

<h3>Add a new formula</h3>
<p>For this example we'll create a formula, that makes the description field visible, once the title has been set.</p>
<br>

<p>First: Enter the Debug mode by pressing <code>CTRL</code>, <code>Shift</code>, <code>Alt</code> and <code>clicking</code> on a 2sxc dialog.</p>
<p>Navigate to the items of your content type in 2sxc. Click on a item and press the Formulas button.</p>
@fancybox.PreviewWithLightbox(App.Path + "/formulas/images/formulas-open.png", 300, 200)

<p>This should bring up the formulas editor. Select the attribute from the dropdown, on which the formula should be set.</p>
@fancybox.PreviewWithLightbox(App.Path + "/formulas/images/formulas-attribute.png", 300, 200)

<p>Select the formula target from the next dropdown. Depending on the chosen attribute available targets can vary due to the content type.</p>
@fancybox.PreviewWithLightbox(App.Path + "/formulas/images/formulas-target.png", 300, 200)

<p>Click on edit to make the formula function editable.</p>
@fancybox.PreviewWithLightbox(App.Path + "/formulas/images/formulas-edit.png", 300, 150)

<p>Now you can write your formula function and test it by clicking on the run button. You will see a change in the current edit form and the result after running it.</p>
@fancybox.PreviewWithLightbox(App.Path + "/formulas/images/formulas-run.png", 300, 200)

<br>
<p>You can access other attributes using the passed data. See <a href="https://docs.2sxc.org/js-code/edit-form/formulas/data.html">data</a> and <a href="https://docs.2sxc.org/js-code/edit-form/formulas/context.html">context</a> object docs for additional information.</p>

<h3>
  Result
  @fHlp.DemoToolbar(contentType).AsTag()
</h3>
<p>
  This formula determines the visibility of the Description field. It only becomes visible when the Title field isn't empty.
  <br>
  Click on the (Σ) button above to try the formula we've added.
</p>
<br>
@Html.Partial("_PartFormulas.cshtml", new { ContentType = contentType, FieldName = "Description"})
<br>
<!-- unimportant stuff, hidden -->